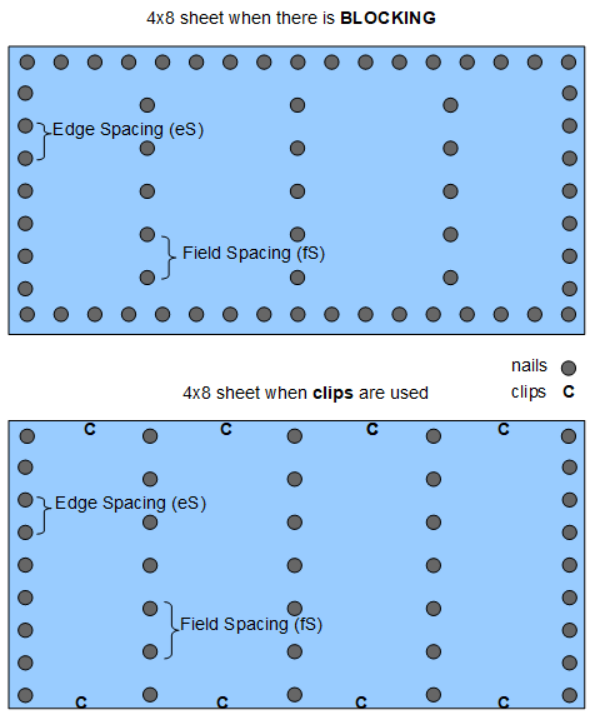
Roof Sheathing Nail Pattern
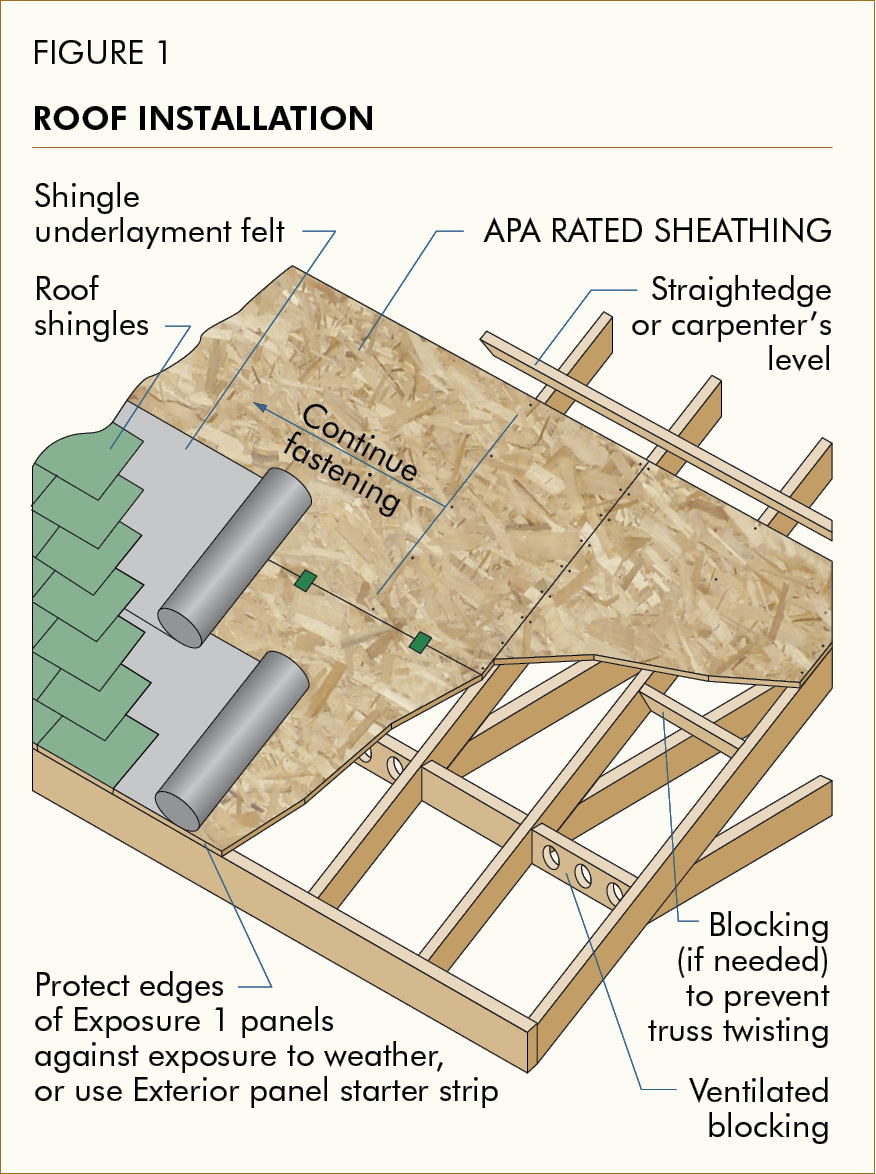
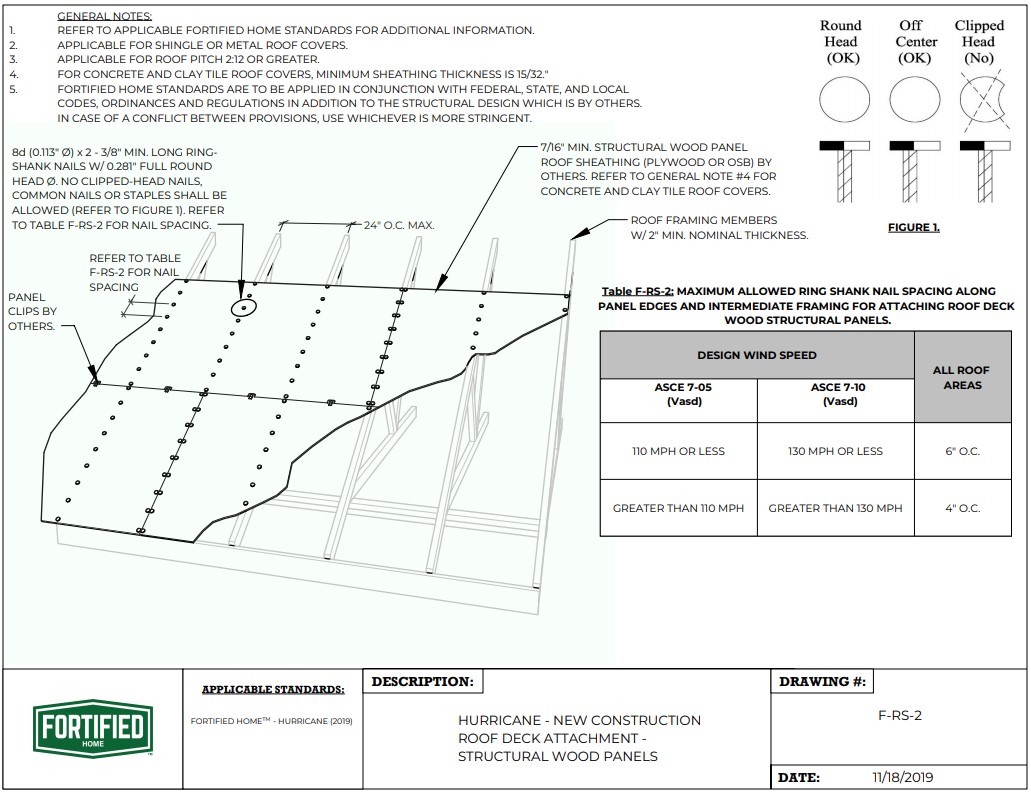
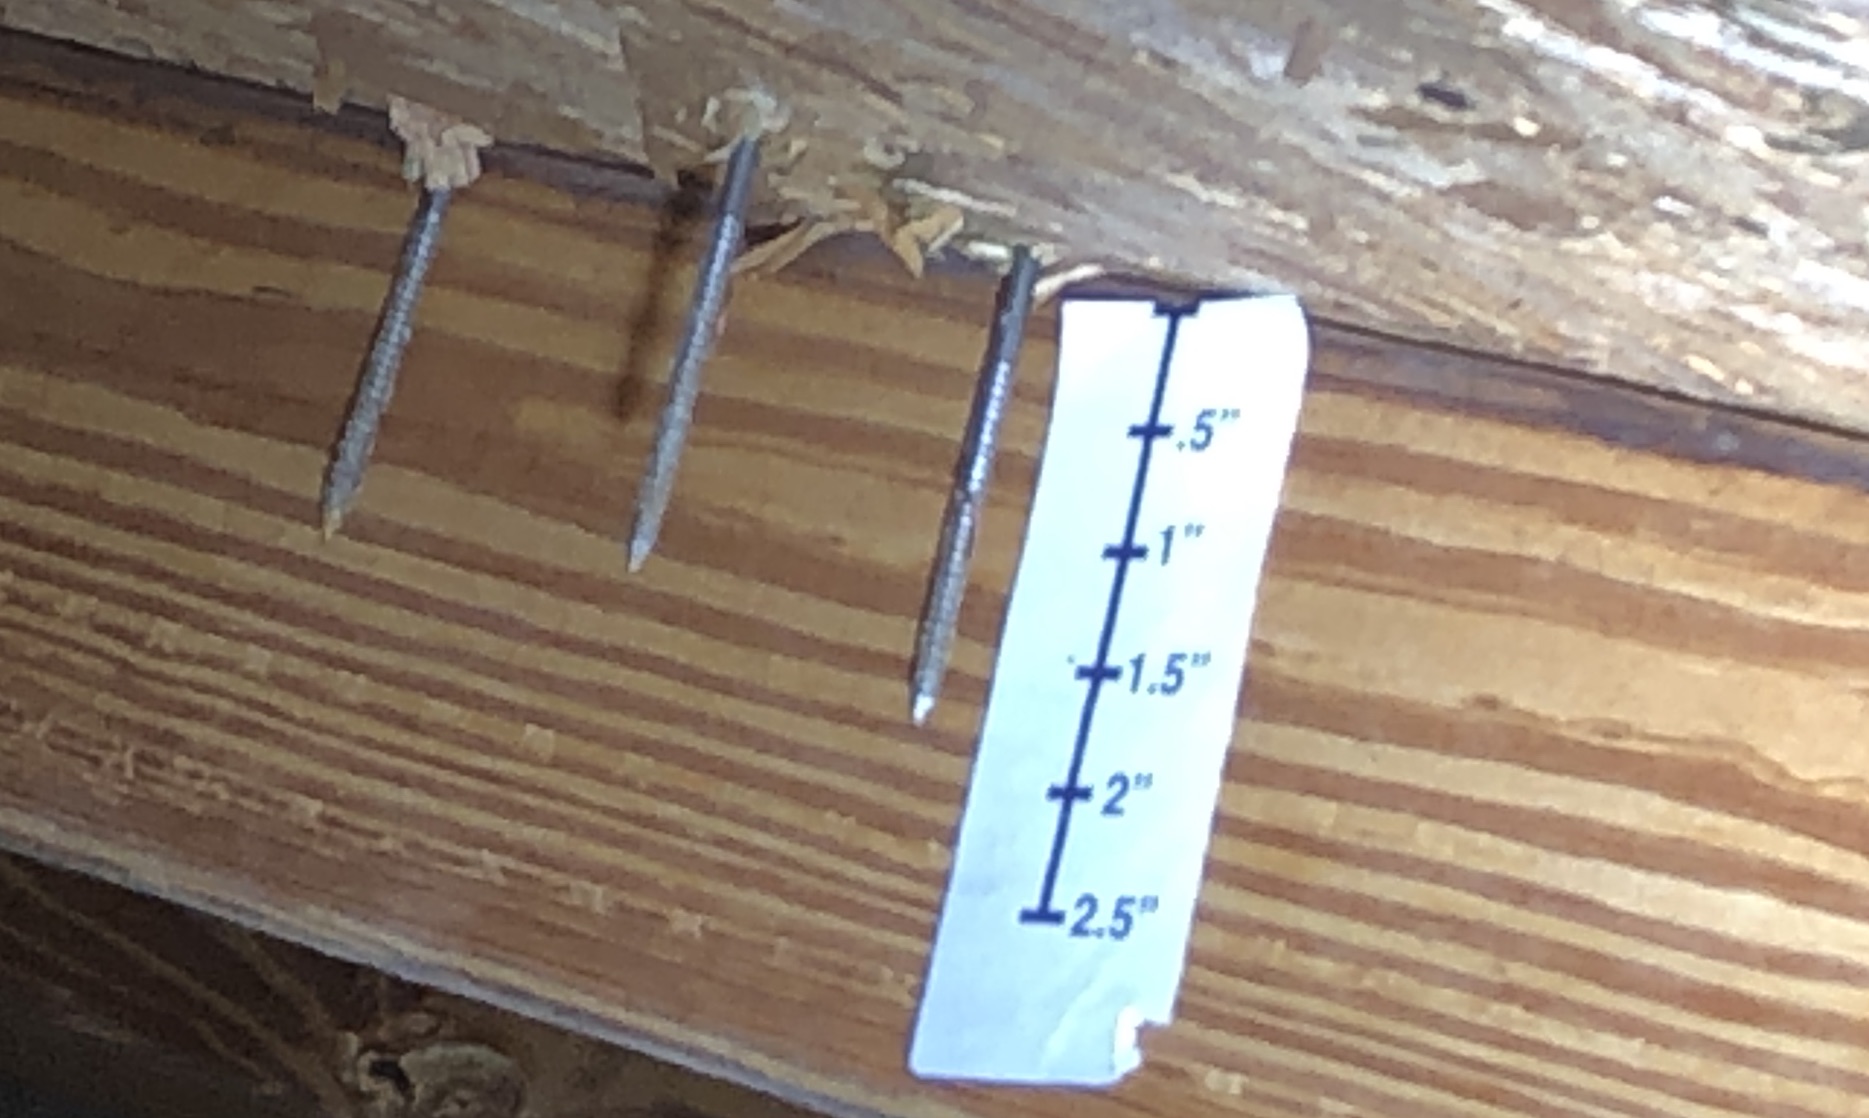
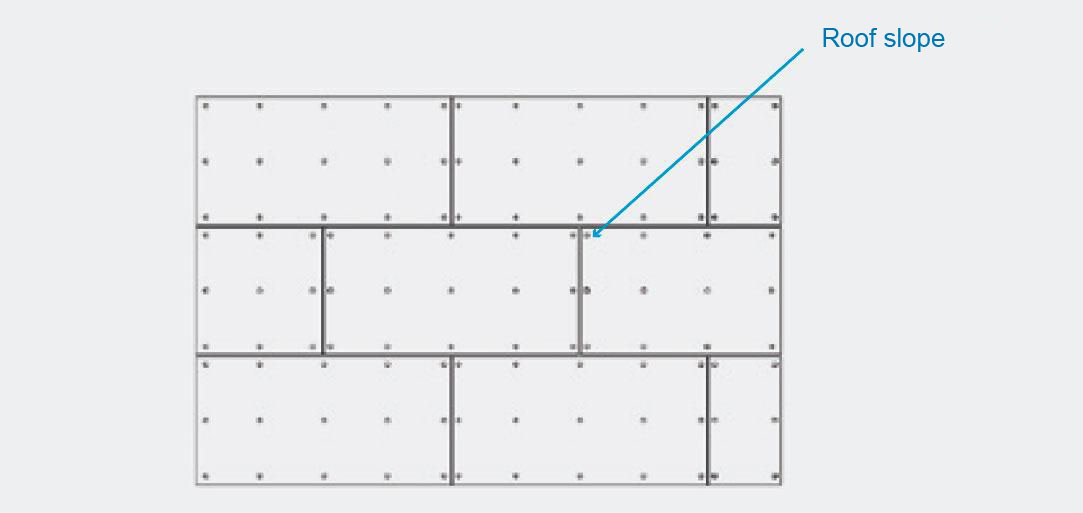
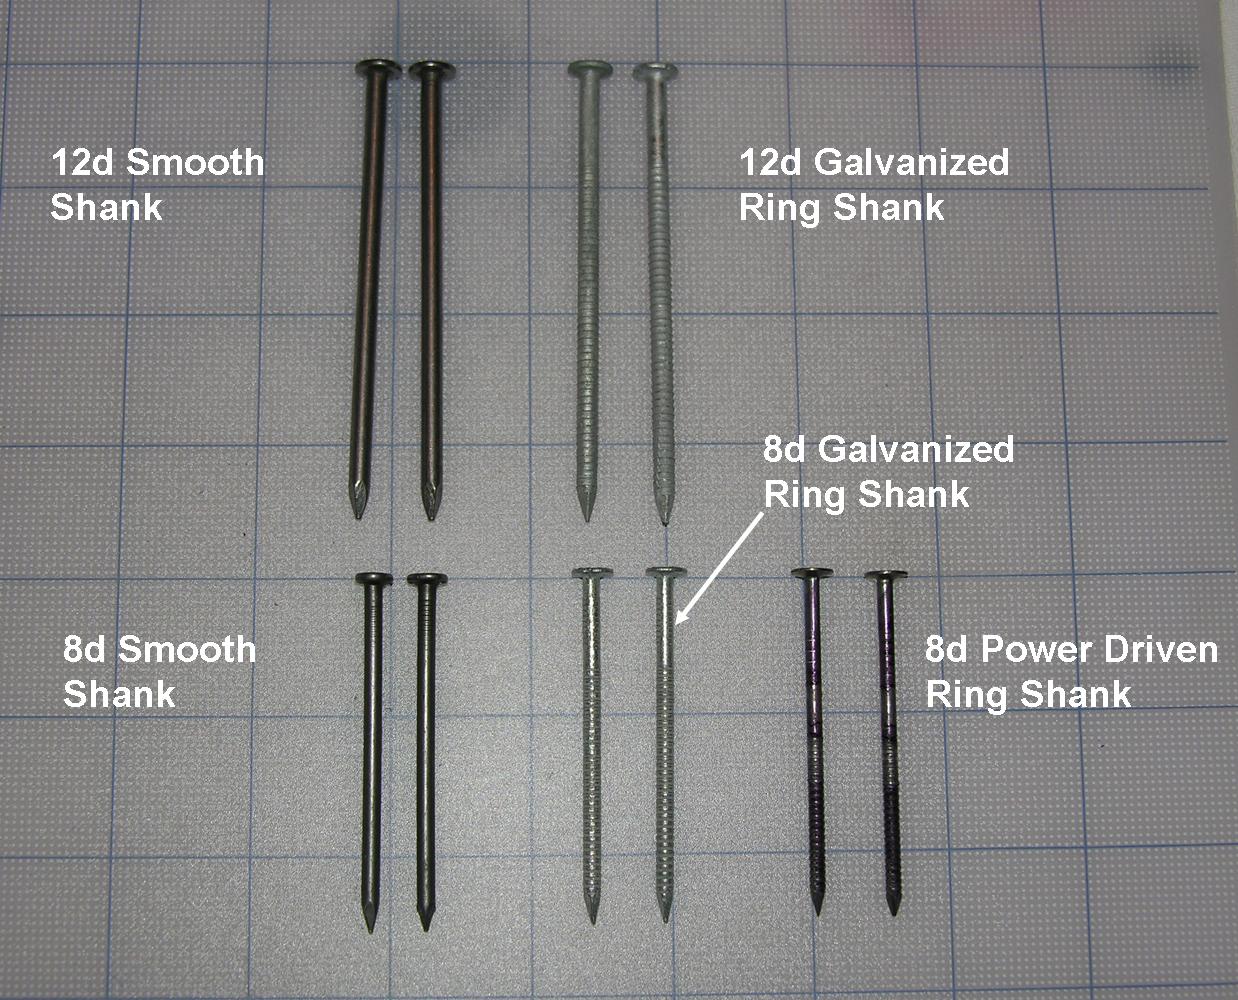
Roof Sheathing Nail Pattern - Install it by driving nails into place near the top edge, and make sure the board is at a slight angle. After that point, a total of eight photos (four taken from above the roof sheathing and four taken from within the attic) are required. The choice between staggered and edge fastening should align with the specific requirements of the project, local building codes, and load considerations. Web stiff eners and roof purlins provide support for all panel edges. Web roof sheathing fastener schedule changes in the 2021 ibc and 2021 irc, nailing patterns for wood structural panel roof systems have been updated. Place the nails closer together and use more of them to create a stronger roof. If you need to install new roof decking or. Check the nailing surface is level. Correct fasteners and nailing pattern for structural wall sheathing. Install shingles according to manufacturer recommendations. After that point, a total of eight photos (four taken from above the roof sheathing and four taken from within the attic) are required. Where the sheathing thickness is greater than 15/32 inches, roof sheathing is required to be fastened. Check the nailing surface is level. Web roof sheathing fastener schedule changes in the 2021 ibc and 2021 irc, nailing patterns for wood structural panel roof systems have been updated. Web in the 2021 ibc and 2021 irc, nailing patterns for wood structural panel roof systems have been updated. Ventilate the roof according to current building codes. Learn about panel layout, nailing off, and roof staging. Web what is the nailing pattern for roof sheathing? Web using the proper nails to attach sheathing will enable your roof to withstand strong winds. Properly fasten panels (including fastening and spacing hints) step 4: The nailing pattern for roof sheathing requires using longer nails with a larger shank, diameter, and head. The choice between staggered and edge fastening should align with the specific requirements of the project, local building codes, and load considerations. Install an exterior sheathing layer. Correct fasteners and nailing pattern for structural wall sheathing. Properly fasten panels (including fastening and spacing. Install one or more layers of rigid foam insulation with seams staggered and taped. Always check for a level. Always check for level nailing surface. Properly fasten panels (including fastening and spacing hints) step 4: Where the sheathing thickness is greater than 15/32 inches, roof sheathing is required to be fastened. Install an exterior sheathing layer. Web the documentation requirements for roof sheathing attachment photos have changed, effective april 4, 2022. Correct fasteners and nailing pattern for structural wall sheathing. Check the nailing surface is level. Web the number of nails needed for a roof varies on multiple factors, such as board face width, length and roof truss spacing. Web using the proper nails to attach sheathing will enable your roof to withstand strong winds. Choose units and enter the following: Cover roof sheathing with shingle underlayment felt. Web roof sheathing fastener schedule changes in the 2021 ibc and 2021 irc, nailing patterns for wood structural panel roof systems have been updated. (l) (s) (oh) (p) (es) Web roof sheathing may not seem like a difficult job, but there is a lot to know about keeping sheets of plywood or osb on a consistent layout, with the right workflow, and proper nailing pattern. Web stiff eners and roof purlins provide support for all panel edges. Install the recommended number of nails per shingle. For those who are. Always check for level nailing surface. Web roof sheathing fastener schedule changes in the 2021 ibc and 2021 irc, nailing patterns for wood structural panel roof systems have been updated. The choice between staggered and edge fastening should align with the specific requirements of the project, local building codes, and load considerations. Install one or more layers of rigid foam. Install one or more layers of rigid foam insulation with seams staggered and taped. Web tips that will make sheathing a roof with plywood easier. Web roof sheathing fastener schedule changes in the 2021 ibc and 2021 irc, nailing patterns for wood structural panel roof systems have been updated. Web install it with 6 inches of clearance at the bottom.. These schedules were calculated to provide resistance to wind uplift pressure as required by most codes. Provide roof ventilation according to building codes (see hints below and figure 2). Always check for level nailing surface. Install the recommended number of nails per shingle. Install shingles according to manufacturer recommendations. Correct fasteners and nailing pattern for structural wall sheathing. After that point, a total of eight photos (four taken from above the roof sheathing and four taken from within the attic) are required. Provide roof ventilation according to building codes (see hints below and figure 2). Check the nailing surface is level. Learn about panel layout, nailing off, and roof. (l) (s) (oh) (p) (es) Web the nails needed for roof sheathing calculator computes the approximate number of nails needed to nail 4x8 sheets to trusses or rafters on a roof based on the dimensions of the roof, spacing of nails on the edges and field of the 4x8, and whether blocking or clips are use. Web when you replace. Check the nailing surface is level. Web the documentation requirements for roof sheathing attachment photos have changed, effective april 4, 2022. Following these simple construction steps for roof sheathing will provide best performance and minimize complaint callbacks. Web using the proper nails to attach sheathing will enable your roof to withstand strong winds. Web install it with 6 inches of clearance at the bottom. Web while ring shank nails are still required, the nail size depends on the sheathing thickness. Always check for level nailing surface. Correct fasteners and nailing pattern for structural wall sheathing. Install an exterior sheathing layer. Web proper installation of apa rated sheathing for roof applications. In most cases, 4 nails are adequate. Place the nails closer together and use more of them to create a stronger roof. Provide roof ventilation according to building codes (see hints below and figure 2). Install the recommended number of nails per shingle. Web when you replace a roof on a home that was built before the implementation of the statewide florida building code on march 1, 2002, the nailing of the roof sheathing (decking) must be brought up to current standards for hurricane resistance as part of the installation of the new roof. A structure's roof truss spacing can vary from every 12 to 24 inches.
Roof Sheathing Nail Pattern Nail Ftempo
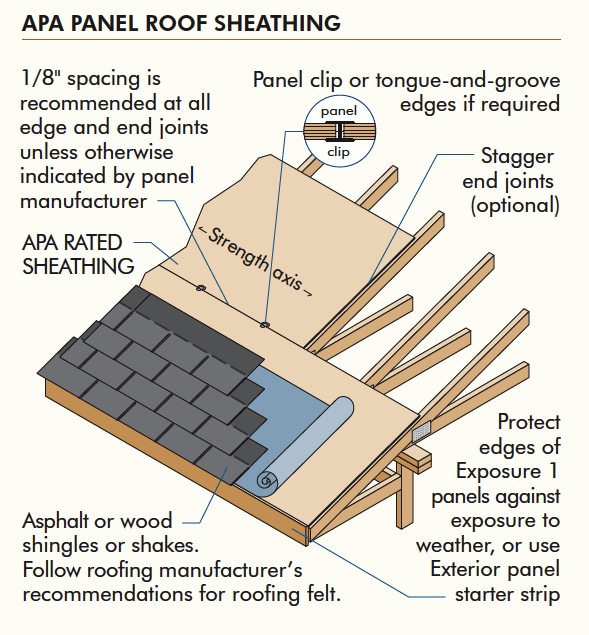
APA Builder Tips Proper Installation of APA Rated Sheathing for Roof

Roof Sheathing Nail Pattern Nail Ftempo
Roof Sheathing Nail Pattern My Bios
Roof Sheathing Nail Pattern Nail Ftempo

Roof decking nail patterns and spacing for roofing YouTube
Roof Sheathing Nail Pattern Nail Ftempo
Roof Sheathing Nail Pattern Nail Ftempo
Nails for Gable Roof Sheathing
Roof Sheathing Nail Pattern Nail Ftempo
Minimum Nailing Requirements For Preframed Panels Are The Same As For Roof Sheathing.
These Schedules Were Calculated To Provide Resistance To Wind Uplift Pressure As Required By Most Codes.
Web Structural Wood Sheathing Shall Be Nailed To The Rim Board If Present With 8D Ring Shank Or 10D Nails At 4 Inches On Center Along Both The Top And Bottom Edges Of The Rim Board.
Install One Or More Layers Of Rigid Foam Insulation With Seams Staggered And Taped.
Related Post: